My First Garment & 5 Takeaways
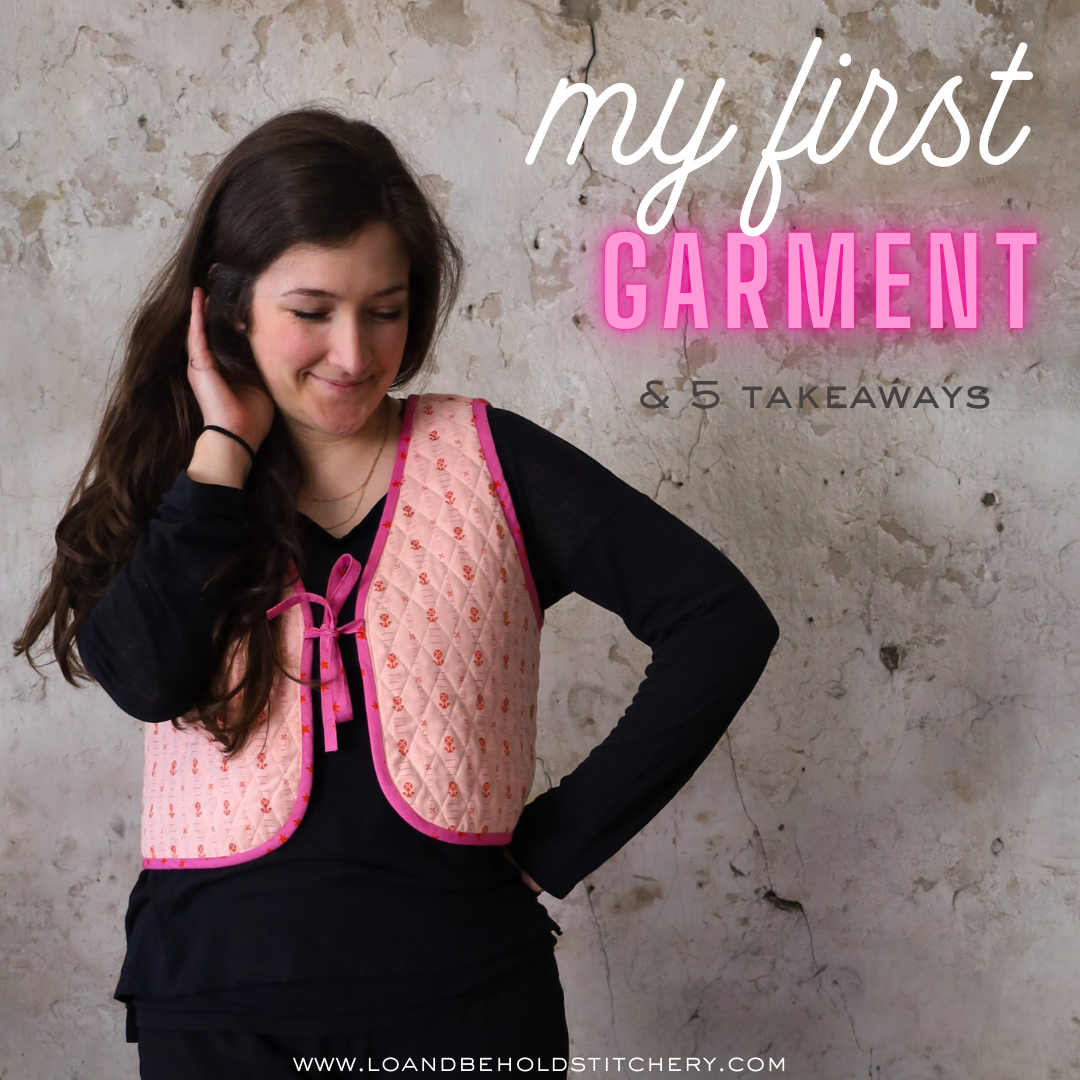
Ya'll! I made my first garment! As you all know, I am a quilter through and through and I have never really ventured into the garment-making world. For some reason, I've never really had the desire because it seemed SO intimidating and I was confused by all the things: sizing, seam allowances, types of materials, the list goes on. However, after seeing several quilted vests at QuiltCon 2024, I knew that that would eventually be my first hand-made garment.

It took me a whole year to work up the courage (and clear my calendar) to make my vest. After a quick search, I landed on making the Ruby Vest by Syd Graham. The thing that I love the most about this vest is how versatile it is. Maybe this is something that is standard for all garments, I'm not sure, but being able to choose a neckline and the length (cropped vs. regular) was so appealing to me. Personally, I loved the v-neck and cropped length so that's what I went with. I also loved that the pattern came with a video tutorial. I didn't follow the tutorial 100%, but it was helpful to see the process before I got started.
Takeaway 1: lots of paper, lots of space
I've seen videos and photos of folks making garments and I knew that there would be some large templates involved, but I didn't quite realize just how much paper I would use. I think it was something like 34 sheets...then I had to tape them all together, which was tedious but not difficult. I learned after the fact that there was a way to only print the size you were making so that you didn't have ALL the size lines on the pages, but that will be something that I try next time. I also learned after the fact that I didn't have to print all the pages if I was selective to only the version of the vest that I was making. Again, something I'll keep in mind for next time!


Since I had to tape so many pages together, I very much underestimated how much space I would need. Thinking about the size of my vest, I assumed that I would need about that much space, but taping the pages together took up a good bit of space and next time, I'll clear off my table a bit more to have more room.
Lesson 2: sizing isn't that complicated
I'm SO glad that this was my first garment because I didn't have to worry about measuring too many things. In my mind, the sizing component of making the pattern was going to be a little more difficult, but all I did was wrap a tape measure across my chest and choose my size from there. I am a little more hesitant to make something with arms, though. I liked the vest because it seems SO straight forward when it comes to the fit and sizing. I think it's a really great starting point for anyone wanting to make their first garment.
I love quilting smaller projects, but I will admit, it was a little weird to quilt this with all of its curvy edges. I quilted 60 degree lines that are about an inch-ish apart and it created such a lovely texture. This was probably my favorite part of the process!


I recently just finished making a double sided quilt (blog post coming soon) and basting it was a little tricky because the two quilt tops on the front and back are the same size. This was a similar experience and I was a little nervous about it because I didn't want my pieces to shift too much. Thankfully, there is some wiggle room in the pattern and since the pieces are smaller, it really didn't shift much during the basting and quilting process.
Lesson 3: bias binding is a must
Another thing that I learned is that bias binding is a MUST. As a quilter, this could really go either way for a quilt with straight edges. I normally use straight-grain binding for my quilts and I actually prefer it because it's a little less unruly and more crisp. However, I learned very quickly as I was making this vest how crucial bias binding is for the process and it made me SO glad that I purchased pre-made bias binding from Bessie Pearl. The process of making the bias binding isn't difficult...but it IS an extra step that I didn't have a ton of time for so I'm thankful that I went this route!

For me, the hardest part of the entire process was binding the arm holes. I think since they're smaller with a tighter curve, it was tricky to maneuver the fabric so that it didn't pleat or ripple. I did have some rippling of my binding in a few areas, but it doesn't bother me too much. :) This was my first time binding something curvy, so I'm proud of how it turned out.

Lesson 4: it didn't take as long as I thought it would
I'm used to projects that take several days, if not a couple of weeks. It was so refreshing to make something that only took about 6 hours from start to finish. I was also relieved to know that I didn't need a serger or any tools/materials that I didn't already have. I spent the most time up front watching the video and orienting myself to the pattern. Now that I know the basics, I'm sure my next garment, whether it's another vest or something else (gulp!) will be smoother and quicker.

Lesson 5: lean into the quirks + details
The biggest part that I enjoyed about making this vest is the unique-ness of my exact creation. Admittedly, I'm not someone who likes to wear a ton of colors and prints. Most of my clothes are mostly neutral and simple. But it was SO fun to experiment with different colors and textures that what I would normally wear. I went into this project with the mentality that if I'm spending my time and energy making something, then I really wanted to make it look handmade and somewhat quirky. If I was buying an article of clothing from the store, I probably would never buy something like this....hot pink just isn't my thing. But since it was my first garment and I knew I'd be wearing it to QuiltCon, I wanted to lean into choices that were just a touch outside of my comfort zone. And I'm glad that I did!


One thing that I LOVE about this vest is that it's reversible. The seams are all finished and it was nice to make that happen without a specific sewing machine or new technique that I wasn't already familiar with. It was mostly like binding a quilt, except the arm holes were a little tricky with the curves. That said, I used my Janome 6700p sewing machine, which is what I usually sew on, and I used standard cotton thread.
Lesson #6 (a bonus)
I can do hard things! It's always a good feeling to tell yourself that you're going to do something...then actually do the thing. I don't know if you remember my knitted cardigan that I started last year. Well, I still have one sleeve left to finish on it, but that was the last time that I really stretched myself to try something new. After this, I'm reminded how much it is good for my confidence to try new things and follow through with a dream. If you have something that you've been dreaming about doing, I encourage you to do the same!


MY FABRICS
My two main fabrics are Maja Stripe in Midsommar and Hilde Floral in Pink. Both are from the Swedish Holiday Collection from Fabelism. My bias binding is Starry Vivid Pink by Ruby Star Society (pre-made from Bessie Pearl).


For the batting, I used leftover scrap 100% cotton batting by Quilter's Dream.
Overall, I cannot wait to make this vest again! If you've never sewn a garment before, I think this is a great first garment to try for quilters. Highly recommend!