Ombre Puff Quilt - alternative techniques!

I told myself I'd never make another puff quilt. Yet, here I am.....sharing about my second puff quilt. (haha!)
Don't get me wrong, I loved the process of making my first puff quilt, which you can read about here, but I honestly thought that we'd never have the need for another one. Well, over the last year, I slowly forgot how much work they are (haha) and I started getting the itch to do the process all over again! Peter uses my original puff quilt alllllll the time. He loves the weight of it, but his only complaint was that it wasn't long enough. I made the "Small Throw size from my Ombre Puff pattern, which actually ends up being slightly smaller than what the pattern says it'll be because you do not press any seams with this quilt. Peter had been asking for a larger puff quilt, so I figured it was time! Since I was going through the process again, I thought: why not host a quilt along?? I was shocked when literally thousands of quilters signed up for this thing! You can find all of the saved information here.
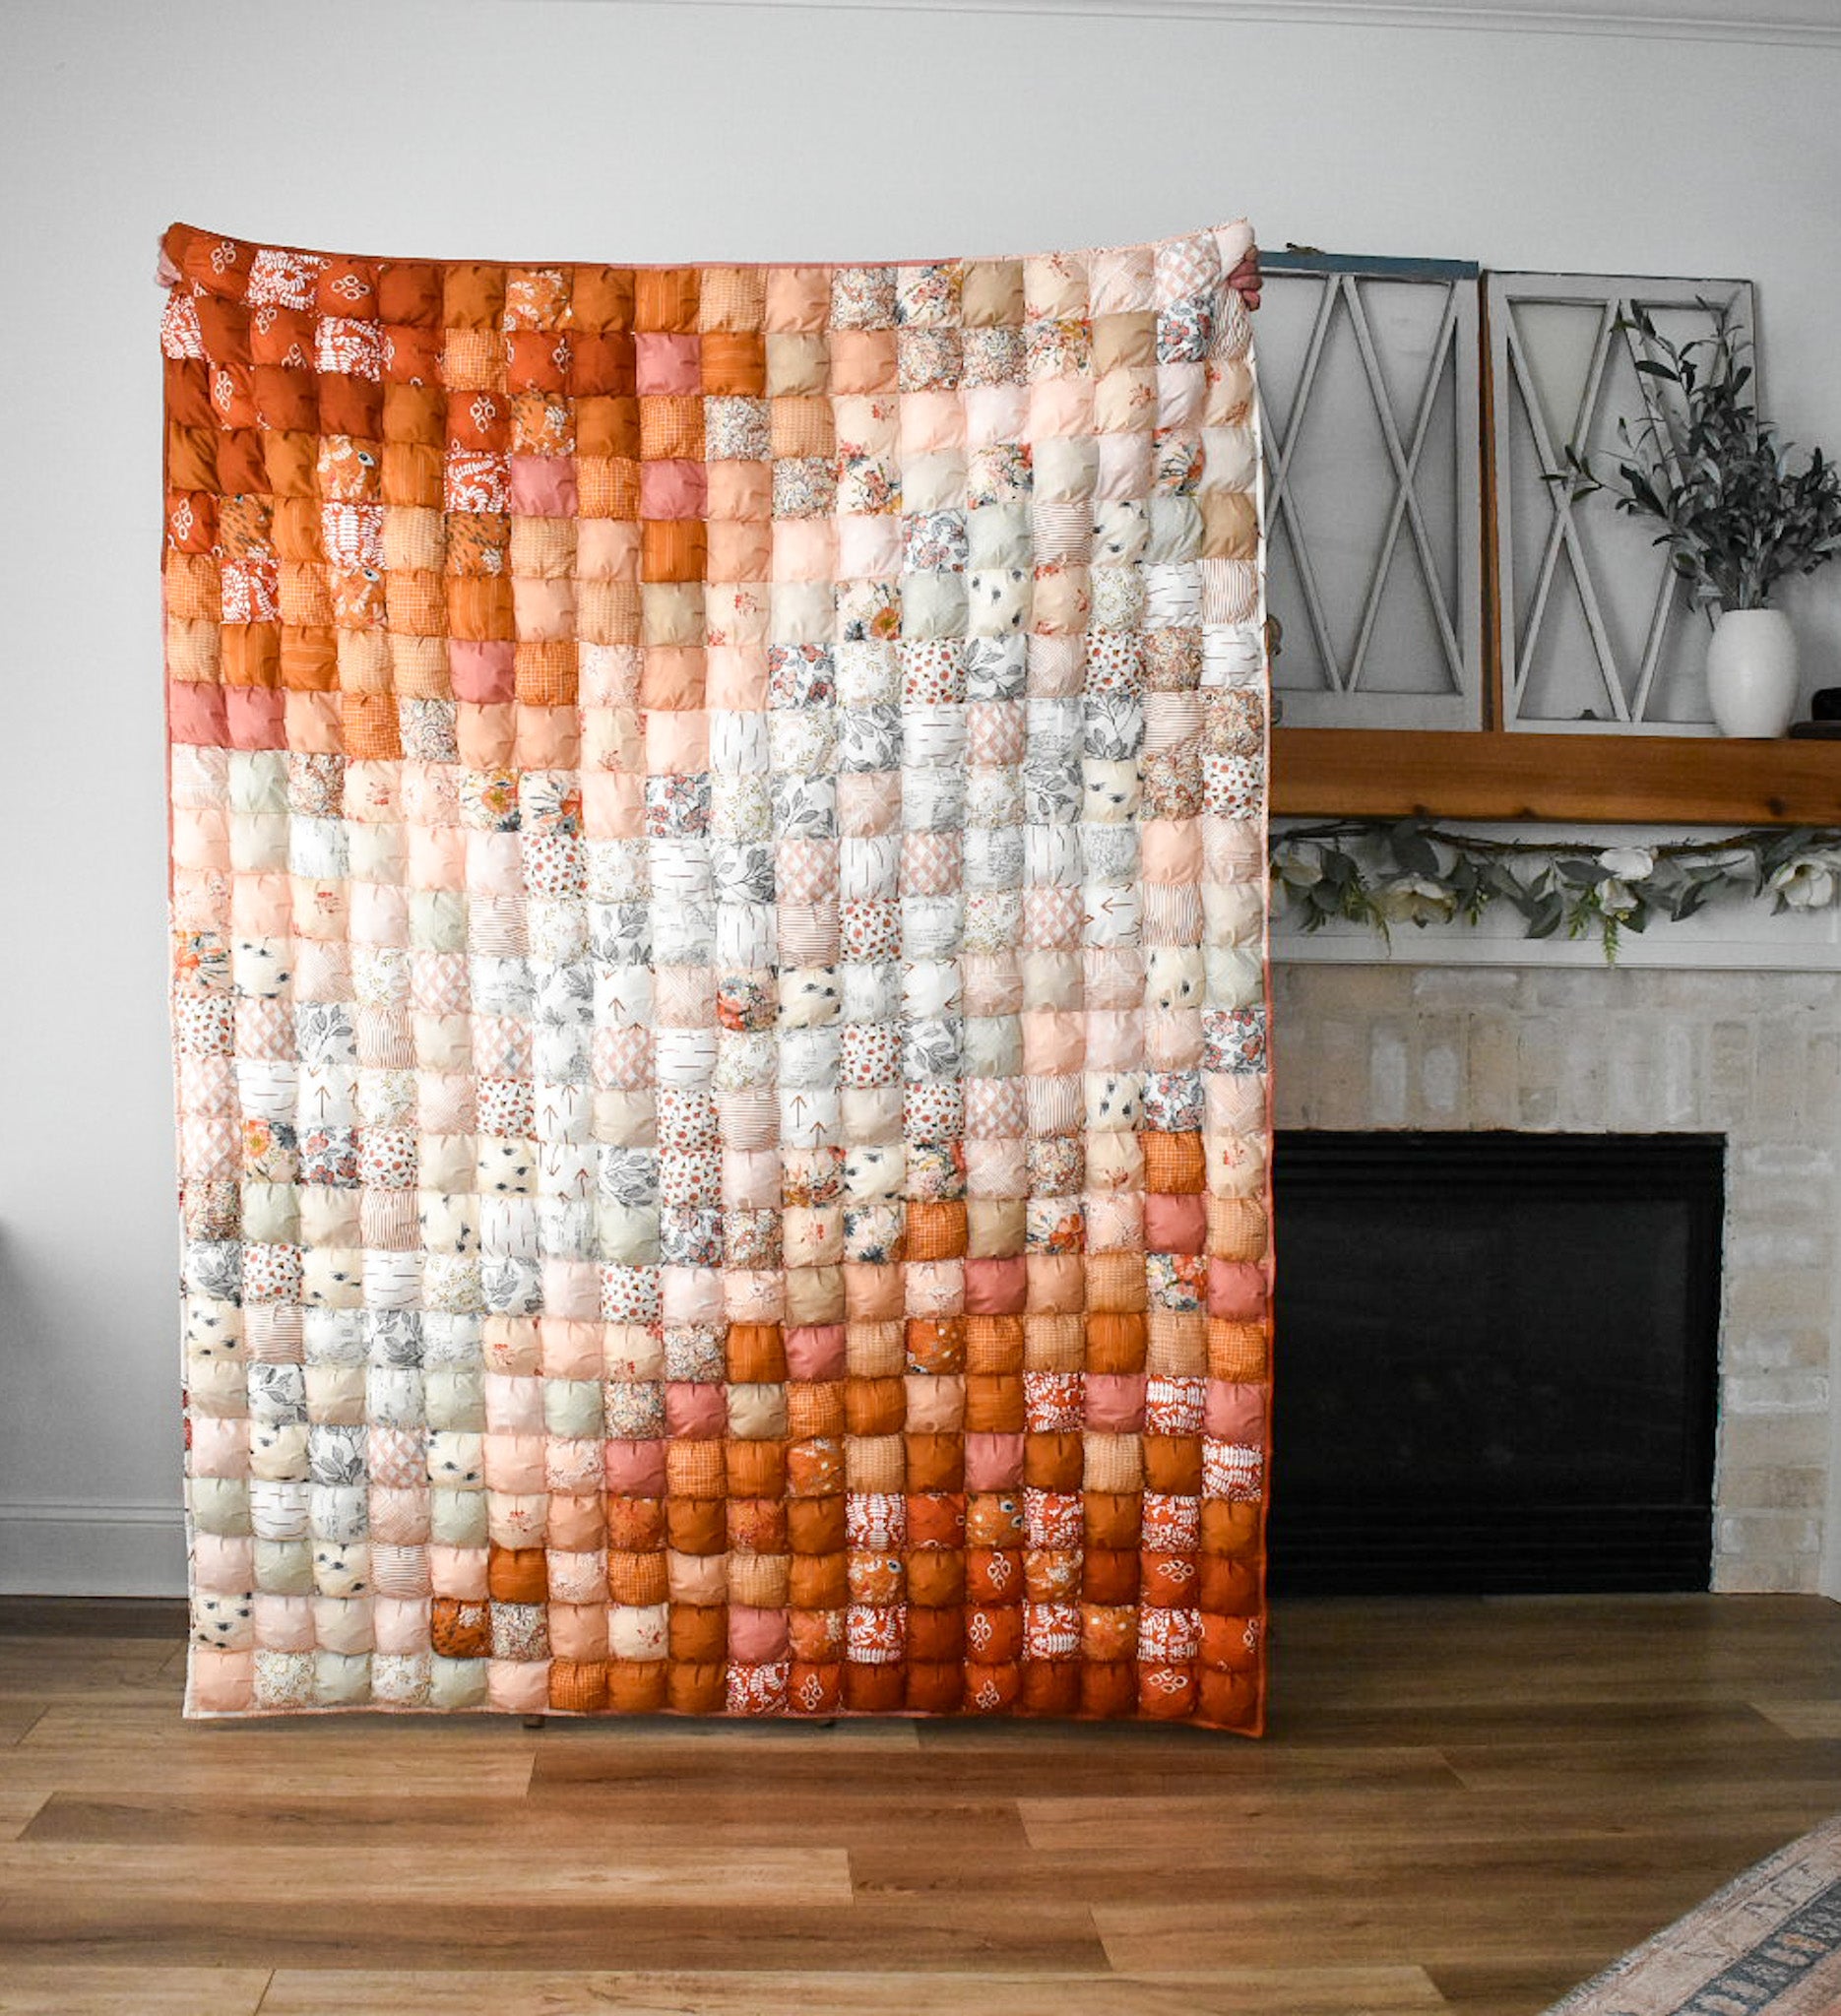
I wanted this quilt to be a little bit more subdued than my previous Ombre Puff Quilt. I decided to only stick with two tones: caramel and cream. I used 30 different fabrics....most were Art Gallery and Ruby Star Society. I absolutely love this color palette!

.

.Here's a list of the fabrics in the bundle:
- Ikat Diamond Rustic - AGF
- Spice - Moda
- Mirror Chorus Terra - AGF
- Gingerbread - AGF
- Meadow Trinkets - AGF
- Caramel Grid - RSS
- Warp and Weft Saddle - RSS
- Cinnamon - AGF
- Toasty Walnut - AGF
- Warp and Weft Earth - RSS
- Ivory - RK
- India Ink Parchment - AGF
- Sandstone - AGF
- Burgeon Forth - AGF
- Add It Up Khaki - RSS
- Dashing Cinnamon - AGF
- Laurel Darling - AGF
- Margarets Letters - AGF
- Slow Living - AGF
- Domestic Charm - AGF
- Backroads Umber - AGF
- Homelike Wishes - AGF
- Rooftiles Clay - AGF
- Positivity Ballerina - AGF
- Crafted Blooms Vanilla - AGF
- Firefly Awaken - AGF
- Trouvaille Routes Sparkler - AGF
- Pale Pink - Moda
- Rambling Rose Briar - AGF
- Painted Prairie Cornucopia - AGF
AGF = Art Gallery Fabrics; RK = Robert Kaufman; RSS = Ruby Star Society for Moda
.

.So I started out with 30 different fabrics, and if you look at the pattern, that's actually way more than what you need. My goal was to create more of a variety in this quilt, like I did with my previous one. As I started making puffs for this quilt, I decided that I wanted to make the quilt even longer than what the "Large Throw" size is....so I added 4 additional rows. It ended up being 18 puffs across by 24 down, meaning that I created 432 total puffs. On paper, the quilt should measure 63" x 84" but again, it's just slightly smaller than that, since we don't press any seams with this quilt. It's LONG, though! Definitely long enough for Peter to use on his recliner with some to spare!

.

.

.

.

.

.Since I was hosting the quilt along, I wanted to try a few new things with this quilt. I do love experimenting and learning new things, but I also wanted to be the guinea pig for anyone who wanted to stray away from my original directions. The first thing that I did differently was use a different filling.
.
FiberFill vs. PolyFil
Ever since I released the original tutorial, I've gotten lots of questions about alternate filling options. Originally, my grandmother used PolyFil, and since it's marketed as being a filling for things like this (and pillows and stuffed animals), I used it for my first quilt. The PolyFil turned out great, but for this quilt, I wanted to try something new so that I could report back and compare both products for you! I did some research and here are few organic options that I found:
- Eco-Friendly FiberFill -This Fiber-fill is made of 100% PLA which is a new synthetic fiber made from the annually renewable resource corn.
- Wool - I don't have a lot of experience with wool, but I'm wondering if it wouldn't stay quite as fluffy as the PolyFil. Again, I'm unsure, so I might make a test pillow and see!
I ended up using the Eco-Friendly FiberFill. I ordered one 3 pound box and I had more than enough to make the large throw, even with the 4 extra rows. Just remember that you don't want to over-stuff the puffs and you'll be fine!
Texturally, the FiberFill and PolyFil are very similar. I did notice more airborne particles with the FiberFill than the PolyFil, but it wasn't *that* much of a difference. The FiberFill is slightly more expensive, but they both behave very similarly once they are in the puffs. I haven't washed my finished quilt yet, so I'm not sure how it washes compared to the PolyFil. But according to the FiberFill listing, it's machine washable.
. 
.

.

.

.
QUILTING - MACHINE TACKING
I've also gotten several questions over the years about different quilting methods. The hand ties are fun, but it can be tedious. I do not think stitching in the ditch with a walking foot would end well (too much bulk) but there something called "bar tacking" or "clasp stitching" that is a really great alternative that is super quick and gives great results.
If you want to try something like this, I recommend making a scrap practice quilt sandwich to practice various stitches before you get started. You can see a few different ones that I tried below. I REALLY loved the star stitches and I actually started out doing those. But as I got closer to the middle of my quilt, my machine's feed dogs were having a hard time moving the quilt like it needed to in order to stitch properly. This made me realize that I need to choose a stitching option that relies on the needle moving, NOT the feed dogs.
.

.Again, I use a Janome Continental M7, which has an enormous throat space which was really helpful for this quilt. I ended up doing a Clasp Stitch #3 in the corner of every other puff and it turned out really great! Once the stitch was complete, I trimmed the tails and I was good to go. All in all, it took me several hours over 2 days to finish.... as opposed to over a week with the hand-tying.
.

.
Here are a few things to keep in mind if you plan to use this method.
- Test out some stitches on scraps before you get started.
- Choose a stitch that moves the needle, NOT the feed dogs.
- If the machine ties a knot for you, you can either trim the tails or bury them. My machine started and stopped each stitch by tying a knot and I just trimmed the tails. If you are concerned about the stitches coming undone, test your practice quilt sandwich and see what you think.
- I recommend stitching in the corner of at least every other puff.
- Start in the middle of the quilt and work your way out.
- My machine has a Stop/Start button that you can use instead of the foot pedal. I found this super helpful to use because at some points during this process, almost the entire quilt would be resting on my lap. I would have a hard time reaching around it, so I discovered that standing beside the table and letting the weight of the quilt be supported by my quilting chair was the way to go! It was really nice to just push a button and let the machine do it's thing while I was standing beside it, not sitting in front of it.
- *IMPORTANT* this made such a huge difference for me.....position your machine so that there is as much table space behind your machine as possible. The more support the better.
- To see a quick video of my process for this, click here.
.

.

.

.
You might recall in my previous puff quilt, I used a "fold-over" method which means I used the backing as the binding. For this quilt, I wanted to try using a traditional binding method, and here are a few things to keep in mind:
Traditional Binding Method:
- Sewing 1/4" around the perimeter before you add the binding isn't required, but I found it helpful.
- I used leftover fabric pieces from the front of my quilt to create my binding strips. I've always liked skinny bindings, so I use 2.25" pieces.
- I sewed the binding onto the front of the quilt using a 1/4" seam as described in my binding tutorial, (it honestly might've been slightly larger than 1/4"). I recommend using the skinniest presser foot that you have. A walking foot may help, but if your puffs are overstuffed, it might be too much bulk for the walking foot. Then I hand-stitched the binding onto the back using this "big stitch" technique.
.

.
CREATING AN OMBRE BINDING
This was the main reason why I wanted to use a traditional binding method for this quilt. I was honestly feeling a little bit indecisive about my binding and I wasn't sure how a darker binding would look with lighter puffs and vice versa. I've created scrappy bindings before, but never intentional ombre bindings. To do this, I laid out my quilt and placed binding strips where I wanted them to go. Then I sewed them together in that order, clipped the binding to my quilt and proceeded as usual. I love how it turned out!

.

.

.

.

.

.

.
We are so excited for how this quilt turned out! It's already in our rotation of quilts that we are using in the living room. :)
LINKS:
- Ombre Puff Full Tutorial - pattern, video, photos of my grandmother's quilt
- Ombre Puff Quilt Along - a week-by-week break down of the various steps, along with alternative methods to create this quilt
- Lois Quilt Collection - This is a collection of quilts that I have created that are inspired by quilts that my grandmother made. Right now there are 3 quilts in the collection.
- Missouri Star Quilt Company Interview - This was a fun little interview that I did with Misty Doan chatting all about how to make the puff quilt!


